Once upon a time...

Once upon a time...
Christmas 2016

Monday 27 July 2009

Camper Part 18: Kitchen Carcasses Complete

As promised in yesterday's installment I got on with the final kitchen unit carcass today.

Having done the major cutting last night, tonight I trimmed the angles on the rear legs for where they meet the roof and assembled the whole lot. I also fitted it, including fixing to the floor, the wall and the cooker unit which it stands next to.

I had to move ond of the light fittings a bit as it will be partially obscured by the cupboard. It still is a bit due to a structural roof bracket preventing me from moving it further. This should be a problem however as the tube can still be changed easily.

Having now completed all the kitchen carcasses, next steps for the kitchen will be the counter tops. I will however be moving back to the bathroom in order to complete the side walls so all structures are in place.

After that, plumbing and electrics with paneling of the various carcasses being the last thing done in order to not have to remove them again (and not dirty them).

I also need to get on with checking the vehicle over for the MOT and booking that for next week.

Today's pictures:

Kitchen cupboard carcass rear and sides Kitchen cupboard carcass front panel Kitchen cupboard carcass fitted Kitchen cupboard carcass fitted Kitchen cupboard carcass fitted Kitchen cupboard carcass fitted

Sunday 26 July 2009

Camper Part 17: Kitchen Kapers Kontinue

Following on from yesterday's successful completion of the bed boxes I started on the second kitchen unit this morning. This is the one which would house the cooker.

As I had stripped the cooker cupboard out of the caravan, I decided to use the front panel instead of trying to fabricate a new one of the same size. The main alteration was that the original panel had a step in it (the cooker was recessed backwards), which I removed. I also has to make it the same height as the sink unit. I achieved this by making up a skeletal carcass very similar to the one I made for the sink unit, but instead of making up a front panel I substituted the one out of the caravan, having trimmed it down.

If you're wondering about the mismatch in materials and hence the patchy look, don't. The entire unit will be covered in birch ply (as will the other kitchen unit). But I am finishing all the unit carcasses first as there is no need to use birch ply between the units. Excess weight and costs more than necessary for stuff that will be hidden anyway.

The final kitchen unit is a cupboard which will be attached to the side of the cooker unit. Not here I could have tried to make them as one and save a bit on the weight, but as I want the cupboard unit to be full (roof) height I figure it was better to make them seperate as they will be easier to install and remove if I need to (for sorting out the floor, etc).

This cupboard will be quite narrow (220 mm - same as the cupboard in the sink unit) as this allows the appropriate space for the passenger seat (and child's bed) to the front of it. It is intended only for kitchen use, so the narrowness should be fine as it will store things like cans, etc.

As can be seen from the pictures, I have already cut all the wood for this unit, so tomorrow night I can put it together. Well, I actually need to cut some more pieces for where the unit meets the roof, but due to the angles I decided to assemble the rest and then take measurements rather than attempt to figure it out and get them wrong. Unlike my usual approaches, I have been very carefull to measure twice cut once and have not made too many mistakes on this build so far (touch wood).


Cooker cupboard carcass before front panels Cooker cupboard carcass in progress Grill front panel Cooker cupboard carcass done Cooker top Cooker cupboard Kitchen unit wood cut and ready

Saturday 25 July 2009

Camper Part 16: Bedtime Bonanza

Last after work I started on the new side panels for the beds. In the caravan the bed boxes were fixed directly to the other cupboards so I needed to create new end panels.

This morning I continued with this, the fiddly bit was that due to the folding step I needed to modify the end and front panels to allow the step to get past. I also had to shorten the beds in order to fix.

The boxes have been completed, but will not be fixed into place until completion of the remaining units. As can be seen from the pictures, I reused most of the original units.

The contraption that you can see in the passenger side unit is the Eberspacher heater. I will possibly relocate this, but at the least move it so that it uses less space.

Tomorrow I hope to tackle the carcass for the second kitchen unit. This will house the cooker and also have a cupboard which runs up to the ceiling for kitchen storage.


Photobucket Photobucket Photobucket Photobucket Photobucket Photobucket Photobucket

Tuesday 21 July 2009

Camper Part 15: Kitchen Kapers Kommence

As per the last installment, then next steps are the caracssing for the kitchen units.

This will allow for then fitting the bed units which in turn will allow for the modifcation of the mattresses to suit the shortened length.

My approach is to make carcasses which will then be skinned in ply. This approach allows me the get the final size of the units while still retaining decent access for plumbing and electrical work.

On Sunday evening after recovering from the headache which had plagued me for the whole day, I measured up the 'wet unit' which will comprise the sink, fridge, a small cupboard and drawer.

As I had retained the old fridge cupboard out of the caravan, I was able to table accurate measurements of the space required. In the caravan the fridge had a cupboard below it as it was placed over the wheel well, so couldn't sit lower. In this vehicle I will be locating it closer to the floor as the sink will be above it and the sink bowl means that the fridge can't be as high. Also having the old sink counter meant that I could easily measure that up as well.


Caravan fridge cupboard Caravan sink counter top


Sketching this out to scale allowed me to figure which wood to use. I had previously purchased a pack each of 44x18 and 33x18 planed pine in 2.7m lengths for this job (I managed to make all the bathroom walls from the wood reclaimed from my neighbours' old kitchen).

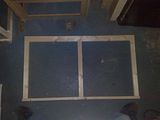
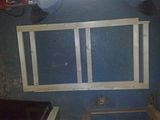
On Monday evening I commenced with the side frames which were finished in short order as they are square and standard shaped, with no wierd walls to comform to.


New kitchen unit side frame New kitchen unit side frames New kitchen unit side frames


Tuesday night was taken off as Lorraine was out of town and I prefer to not work outside with Kyle alone in the house.

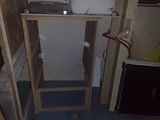
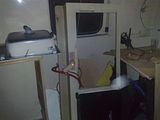
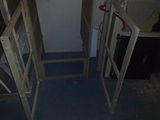
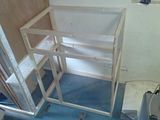
On Wednesday I was able to complete the carcass started on Monday. The photo shows it in place in the vehicle although not fixed in at this stage. The large area on the right is for the fridge, the narrow vertical area on the left is the cupboard mentioned. The upper horizontal area will be divided in two with a drawer on the left, while the right hand side will have a cosmetic 'blanking' cover as the sink bowl will be behind this space.


Fridge and Sink unit carcass


Next steps are:
  • Add the vertical divider for the drawer

  • Add a framework for the fridge to rest on and be fixed in place with

  • Complete some of the bathroom piping and outside of the bathroom wall

  • Fix this unit in place

  • Fill the three holes in the floor caused by the removal of the stretcher fixings


The above will then let me continue with the beds and then the cooker unit which will stand opposite the sink unit.

Sunday 19 July 2009

Camper Part 14: Wall done

On Friday evening & Saturday I managed to get the intricate details of the rear bathroom wall completed and the shower pipe installed.

The bathroom fixings which came out of the caravan are plastic, with the cabinet actually just being a cover with sliding mirror doors.

I had to made up the shelves, etc which live behind it. This was tricky work as it had to be the correct size to suit the plastic cover and also fit into the nooks and crannies created by the odd shaped roof of the ambulance.


Rear bathroom wall Bathroom cabinet frame


As an aside, in order to speed up cutting the small strips, etc that I needed, I took the time out to make a table for my circular saw. I'm very cautious of these tools as I've seen someone lose a thumb before.


Circular saw table Circular saw table Circular saw table


I also had to install the shower piping before completing this as it is hidden behind it. I used copper piping for this section as I wanted it to be high pressure and needed some solidity where the shower head fits. The pipe is an odd shape as it makes it way around the various shapes of the roof. I used soldered joints wherever posible and glued it in with the structural adhesive/sealant that I have been using. This remains semi-flexible so will have some give if the vehicle flexes at all.

For fixing the shower head on, I discovered that the thread on a standard shower head is the same as 15mm copper pipe and tap fittings. I used a brass tap wall mounting fitting (this is glued to the roof. It has a female threaded section, so I then screwed in a straight connector which has two male fittings, as the shower head itself has a female fitting.

Height wise the showerhead has enough room for me to stand up and wash my hair, but anyone taller will have to stoop.


Shower pipe


Next up is the kitchen sink & fridge unit carcass. I had hoped to do this on Sunday but illness prevented it.

Sunday 5 July 2009

Camper Part 13: Dancing on the Ceiling

If you haven't been following from the beginning, this camper build starts with Camper Day 1: The adventure begins, or if you just want to see the previous post, have a look at Camper Part 12: Batten down the hatches.

Since the last update I have managed to panel the ceiling above the cab. This was done with 4mm Birch Ply which has been applied over the battens mentioned in the previous update.

I inserted some recycled plastic insulation between the roof and ceiling. I thought this would be a better bet than the fibreglass type as this is non-itchy but looks the same.

If you have a look at the pictures you will see that I have completed the paneling on the right hand side, but not on the left. This is deliberate as I needed to completed the left before I could commence with the shower/toilet room. The other side will be done when I figure out exactly how I will be mounting the seats.

For those of you who remember 'Camper Day 10: Raising the Roof', I have eventually re-installed the piece of fibreglass which was removed and trimmed down. If you look carefully in the photographs you may be able to see that the ply ceiling and this fibreglass section meet up evenly.

I used a piece of 4mm ply to panel the outside wall where the showerroom will be in order to create a flat surface on which to mount the plastic cladding that I will be fitting. The wall is not perfectly flat as the outer skin of the vehicle has some shape in this area and I needed to maximise internal room. The single sheet of ply however gives a continuous surface so the cladding should be relatively straightforward to fit. I sourced the cladding from on the internet, but wasn't contacted back by the supplier. In the end I managed to get something similar from B&Q.

You should also be able to see that I have started on the skeletal framework for the rear wall of the showerroom. This wall has a number of 'shelves/supports' as part of it which will support the plastic bathroom boots salvaged from the caravan. The plastic pieces are quite flimsy (I guess to keep them light) so need some form of support.

The race is on to get the kitchen and beds in so that I can take the Sprinter in for it's MOT, so my first goal is to get these bits in even it not in the final state of decoration else we can't use the vehicle.


Ceiling panellingCeiling panellingRoof raisedShower wall paneling


Shower rear wallShower wall panelShower rear wall