Once upon a time...

Once upon a time...
Christmas 2016

Sunday 24 May 2009

Shed load of Storage

For those of you who have been following the build of the Camper and wondering what happened to me, here's the explanation.

Lorraine was out of town most of this last week and this combined with Kyle (our 7-year old) being ill meant that I haven't been outside tinkering with the camper in the evenings. Building was meant to resume this weekend, but I got side tracked.

I have been keeping an eye out for a decent sized shed to replace the rotten 4x6 foot one that came with the house. On Wednesday I saw a Freecycle advert offering an 8x14 foot shed in Dorking (just down the road). I replied and couldn't believe my luck when I was offered the shed after confirming the I could and would collect that evening.

Well, the ambulance quickly became a shed transporter and Luca (a friend from work) and I went to collect it. He came by again on Friday evening to help remove it from the Ambulance and carry the bits into the garden.

These two pics show the shed flat packed lying all over the garden and the corner where the old shed is which is where the new one was destined to go.

Photobucket Photobucket


Installation meant digging out the roots of the tree that was cut down last week. This took me a good few hours.

Photobucket Photobucket


The old shed and water butt were emptied and moved. The pics below show the cleared space and the contents of the shed and many buckets of water.

Photobucket Photobucket Photobucket


Obviously the floor went in first. This was set on top of 'garden' sleepers in order to give a solid base. I also prefer the raised approach as this allows some air flow. (I had to repair one of the floor joists and replace the lowest board on the same side of the shed as these had rotted).

Photobucket Photobucket Photobucket


This was followed by the walls. You can just make out the metal brackets I made to re-join the apex to the rear wall. A similar repair was made to the front wall as we had to cut these off to fit the shed in the ambulance. The floors were also cut but you can see the joins as the tongue and groove boards have slotted back into place and I have put the sleepers under the joist joins.
As you can see, my 'helper' enjoyed the sunshine.

Photobucket Photobucket Photobucket Photobucket Photobucket


So having spent most of Saturday & Sunday on this project, by the time I downed tools to go watch the Monaco Grand Prix, we had a shed with a roof and the water butt had found a new home. You can see that it has been painted with shed & fence paint. I think another coat or two may be needed as the walls were very dry. The final job will be to put some new roofing felt on as the old was cut when the roof was dismantled. I just didn't have the energy today.

Photobucket Photobucket

Sunday 17 May 2009

Camper Days 14 to 16: Radical Rethink!!

If you haven't been following from the beginning, this camper build starts with Camper Day 1: The adventure begins, or if you just want to see the previous post, have a look at Camper Days 12 to 13: Starting to come unstuck........

The reason for the delay in the update is that I had planned to go to Milton Keynes on Saturday (Day 15), which means that Friday evening was spent readying the van for the road. On previous nights I was able to leave it in a non-drivable state.

I did go to MK yesterday and spent the whole day there, got back at around 9pm, read on for the details....
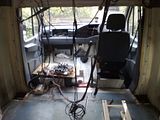
Radical Rethink!!
If you've been following the previous posts, you will know that my intention was to have my friend Pete help me modify the 'hoop/brace' behind the cab to open up the space for better access and space utilisation.

We discussed the possible changes and started dismantling the structure. We realised due to the cutting I did for 'Raising the Roof', the corner panel could simply be pulled out. this enabled us to see the underlying metal structure. Following much investigation and debate, we figure out that the 'hoop/brace' formed no structural part of the remaining body work. It appears that this is used for the over cab storage, all of which I have already removed.

The decision was then made that this metalwork would be removed in order to gain extra space in front of the proposed rear passenger seats. I set to on this and then realise that if the hoop wasn't structural, I may as well remove it from both sides and therefore gain the corner which would have been cut-off in the shower. One thing led to another and I have now removed the 'hoop/brace' entirely and have decided to shift the shower & sink to the driver's side of the vehicle. This gives multiple benefits in that the diesel tank is on the passsenger side, so having the shower above that would have meant running pipes across from left to right for the water supply & waste. This way the water & waste tanks can be directly below the shower/sink. MUCH SIMPLER.

A secondary benefit is that the shower forms a bulkhead behind the driver which is a blind spot anyway whereas the left side is now more open.

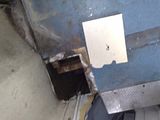
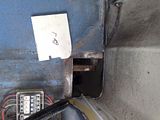
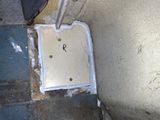
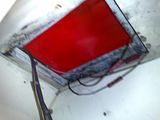
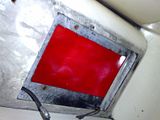
In the pics you can the pieces of wood I cut to fill in the holes left where the metal work had gone through the floor. The floor is 12mm plywood, so cutting some old shelving to suit and screwing and gluing it in was a simple job. I made some templates out of an old cereal box and then cut each piece to sixe using a jigsaw. One of the chassis outriggers is under the hole (the metalwork was bolted to it), so it will be strong enough, but to be sure it doesn't tilt, I screwed in some lengths of off cut underneath and everything was glued in and sealed with some semi-structural that I got from Pete.
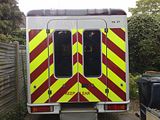
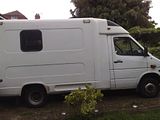
Mostly unstuck & de-lettered
You should also noted from the pictures that almost all of the stickers have now been removed. The only ones remaining are some of the yellow ones on the passenger side (it started raining again) and the chevrons on the back.

All the wording has been removed although Pete did decide to leave the word Mercy on the passenger side, subtling suggestion people should take pity on me.
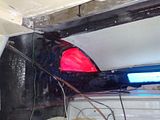
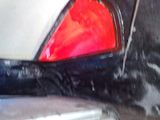
Red & Blue is Black
Further to the de-stickering, the goal of which was to not be seen to be impersonating an ambulance, I wanted to change the colour of the 'blue' lights. My intention is to prime these on the outside and paint them white to match the vehicle, but a lack of white paint and the rain put paid to that. I had a can of red aerosol in the garage, so I decided to spray the insides of the lights red. Now when you view them from the outside they look black, which has made quite a difference.

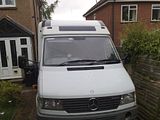
Along the same lines, Pete gave me a spare grill that he had, so the blue strobes have now also been removed the front. I did keep my badging (412D, as well as the star, as these were better).

When I manage to remove the remaining stickers I need to get the sticky-stuff off as well which will make the whole vehicle look better.

Instead of de-stickering the driver's door, Pete & I fitted the one which I bought off Ebay and fetched last week. It really is a lot better than the old one. Unfortunately this work brought to light the fact that the door check strap was broke (they all go after a while), and while the one on the door that I bought was brand new (they cost about £40 and I only paid that for the door), it is the wrong one, they fitted a left hand one to the right hand door. So I'll have to buy one of those. At least I have a new one for the passenger door without having to buy one.

Poor Power
Going up to Milton Keynes (and on a trip today to fetch some racking & a water heater), I have been having trouble with the van not starting, as if the battery is run down. Considering that I'd just done a decent run, one would have expect the battery to have a good charge. Pete & I checked the chargin rate and that seemed fine. We were suspecting a dud main battery (the van has a second battery for all the extras). Today I swapped the two around an since then the van has started everytime, so it seems we way be right.

Exhausting MOT Prep
My next main task/focus is to get the van MOT'd. The two faults that I knew about were a faulty low beam on the head light and a small hole in the exhaust. The headlight turned out to be a blown fuse (I borrowed one of the resettable one of the same amperage for now till I buy some more) as well as a blown bulb. I didn't have a spare bulb as my car uses a different type, but then later while removing the rear blue lights I noticed that they use the same bulbs. RESULT!!

As for the exhaust, the hole is in one of the pipes, quite near to a mounting bracket, so I bought two different exhaust repair kits. The first is some adhesive foil (had I known, I'd have raided the kitchen cabinet) which I wrapped around the pipe. This is meant to be good enough, I didn't want to take a chance, so I also got another repair kit which is the sophisticated (read expensive) equivalent of cutting up and old drinks can, wrapping it around the pipe and then clamping it with a large hose clamp. This one is slightly better in the the clamp is welded to the metal (can). I wrapped this over the foil and clamped it down. SORTED!!

The final job for the day was to tidy everything away, this included screwing the fuse board down to the floor (as I've removed the bulkhead), as I need to drive the van tomorrow to take it to a local MOT tester, to see if it is small enough for his workshop. I hope it fits else I have to find somewhere else and have struck out so far.

Anyway, here are the pics for today...


Radical Rethink! Holy floor 1 Holy floor 2 Ptached 1 Patched 2 Red is the new blue 1 Red is the new blue 2 Red is the new blue 3 Red is the new blue 4 No name blank canvas Clean(ish) nose

Thursday 14 May 2009

Camper Days 12 to 13: Starting to come unstuck....

If you haven't been following from the beginning, this camper build starts with Camper Day 1: The adventure begins, or if you just want to see the previous post, have a look at Camper Day 11: Taxing Triumph & Dashed Wiring.

I'm not get a lot done during the evenings after work, but I have managed to to at least something everyday.

Last night I fixed the headlight wiring, having removed the conversion loom the night before. There were some add-ons to make the headlights flash alternately, but I am trying to revert the basic vehicle wiring to standard where suitable.

I also finished the removal of the overcab wiring which went to the dash control switches. The only non-standard wiring left in the dash now relates to the battery cut-out, air horns and the air suspension, all of which are features that are being retained.

Tonight while it was still like I decided to start removing some of the stickers. Due to the narrow drive I can only really get to one side of the vehicle at a time, so I tackled the left side. All bar one of the green stickers are gone from that side and some of the yellow ones. They are a different type of sticker, with the green being stronger and hence easier to remove. The remaining green sticker is a pain as it literally needs to be scraped off. It's almost like tinfoil.

When it started raining I did some work inside. Here the theme was wiring again as I altered the interior light wiring to suit the changes that I am making to the roof. I am also pulling out redundant wiring were applicable. If I need to refit wiring later for specific purposes I'll do so, but at this point as I discover what the wires are used for I may as well dispose of the extras.

Some pictures for today, but not very pretty as most relate to the wiring.


Photobucket Photobucket Photobucket Photobucket Photobucket Photobucket

Tuesday 12 May 2009

Camper Day 11: Taxing Triumph & Dashed Wiring

If you haven't been following from the beginning, this camper build starts with Camper Day 1: The adventure begins, or if you just want to see the previous post, have a look at Camper Day 10: Raising the Roof.

Lorraine went to the DVLA Local Office in Wimbledon today and got them to change the vehicle's taxation class to PHGV and purchased 6 months tax. This means that I can start moving it about when required which is a triumph. Once the conversion is complete we will be checking how to go about having it classed as a Motorcaravan.

The next challenge is to figure out where to get it MOT'd. The current MOT has not yet expired, but it doesn't have long to run. I called the local VOSA Testing Station (bit of a misnomer as the number rings at a central call center anyway) and asked. They said I should call the local council. That's a bit like calling NHS Direct to find out the nearest A&E and them telling you to call your local Police Station. Surely VOSA should know!!!

This evening I trimmed the roof corners left to be done after last night's 'Raising the Roof' cut-a-thon, and then followed this by tackling the dash wiring. I want to pull out the redundant wiring before the weekend as I need to move the loom that is fed across the back of the bulkhead and through the roof at the B-pillar.

In order to do this I removed the rubber floor mat the top of the dash. I then slowly started figuring out one set of wires at a time. I have traced the wires for the battery cut-out (these are staying) and the air horn (these are also staying but will be re-connected to a new switch), both of these ran across to the left of the dash and through the firewall.

Luckilly the conversion wiring has generally been bound with small cable ties, whereas the Mercedes wiring is wrapped, so it is easy to distinguish. I saw a 3rd fatter sub-loom also going across to the left of the dash and through the firewall so traced these into the engine. I discovered that they supplied the siren, blue grill lights and what I believe are the headlight flashers. I have stripped this loom out back into the cab and will fully remove it next time.

I'm taking the slow but steady approach on the wiring as I don't want to end up with an undrivable vehicle and then have to call in the cavalry. Auto-electrics aren't my strong point, but I do have a logical/system problem solving approach so should be ok.

Today's pics focus on the trimming and some coverless dash pics.


Trimmed some more Trimmed the left corner Trimmed the right corner Dahsed wiring More dashed wiring Under dash wiring

Monday 11 May 2009

Camper Day 10: Raising the Roof

If you haven't been following from the beginning, this camper build starts with Camper Day 1: The adventure begins, or if you just want to see the previous post, have a look at Camper Day 9: More destruction....

Short update today as I didn't spend much time on the camper. I decided to cut out the roof (ceiling) section that Lorraine & I discussed yesterday. For some reason this section of about 30cm depth running back from the original bulkhead was about 1 to 2 inches lower that the surrounding sections. I plan on trimming it down and putting it back in place so that it is flush with the surrounding section. This will make it the same as the roof/ceiling that I discussed yesterday which needs to be fitted in the over cab area.

Removing it was hell. I had trimmed it back where I could see it was one piece, but due to not being able to see inside I couldn't tell exactly how it was fixed inside. I ended up cutting it back where I will be trimming it anyway. Once I managed to remove the section and could see the way it had been fixed, I found that I had to chisel the sealant/glue off. Hopefully I get some of the same stuff for the bits I have to put back, as it is virtually indestructable.

The pictures below show the area after the removal of the center section and the loose section which will be fitted back in place. In one picture I am holding the panel up to demonstrate where it was.


Roof section removed Roof section removed right Roof section removed left Roof section removed wiring loose panel Where it was


Sunday 10 May 2009

Camper Day 9: More destruction...

If you haven't been following from the beginning, this camper build starts with Camper Day 1: The adventure begins, or if you just want to see the previous post, have a look at Camper Days 7 to 8: Bulkhead Breakdown.

For today, the update is as follows. First thing this morning I went to fetch a new drivers door which I won on Ebay. The current door has some rust and the Ebay one went cheap enough to be worth buying rather than mending the old.

On my return, a spot of gardening (mowing the lawn after fixing the lawn mower) was followed by more destruction.

I decided to try my luck and I cut out the over cab box section from the inside. This negated the need to remove and reseal the cover panel. Luckily my guess was right and it was just some wasted space. This was followed by cutting out the front 'blue light' pods. The photos will show that this area is now much larger than before. Where the cover panel seals there are some lips of about an inch in size, but I figure that if I insulate this area and cover over with some mdf or flexible ply then this will all be hidden anyway. First I need to sort out the blue ambulance sign and the above cab wiring.

Following the cutting marathon I decided to have another go at figuring out some of the wiring, so partially stripped the dash while making sure the vehicle stays drivable.

The final conclusion for the day was to discuss some changes to the roof area to open the above cab access by about 2.5 to 3 inches with the Lorraine. This will give much needed storage or headroom if we decide to put a kiddy bed up there.

See the scary pics....